Wednesday, 25 September 2013

HT Employee Monitor 9

employee monitoring software is professional surveillance software, designed to monitor and control employee activities. The software contains many features to improve employee productivity and prevent the wasting of work time. HT Employee Monitor records all your employees' computer activities and gives you remote access to this information, including typed keystrokes, visited websites, opened applications, screenshots, and more. The software helps you to increase employee productivity with monitoring, as well as by blocking activities that are not work-related such us Facebook, Twitter, instant messengers, specified web content, etc.
Do you want to improve employee discipline and productivity? You should try employee monitoring software.
Install this employee monitoring software and let your employees know that all their computer activities are recorded. Just knowing that they're monitored, employees work more efficiently. Statistics confirm that surveillance improves employee discipline and their productivity.


Downlod now- http://reliabledownloads.org/file/0Sy659
Ginger Grammar and Spell Checker 3.21 New Released 2013

Ginger Proofreader checks and corrects spelling mistakes, misused words, and corrects grammar mistakes, based on the context of the full sentence.
The product operates as an online service and supports MS-Word, MS-Outlook, MS-PowerPoint, Internet Explorer, Firefox, Chrome and Safari.
Ginger Proofreader's novel patent pending technology is based on a unique text-correction algorithm that automatically analyzes the context of errors in written English and selects the most appropriate semantic and grammatical correction.
With the award-winning Ginger Proofreader, you can be confident that your emails and documents are using properly structured grammar and correctly spelled .
Ginger Proofreader has been receiving rave reviews from users. Get it now for free!
Download Now - http://surefile.org/file/0Sy6w
Tuesday, 24 September 2013
Online converter for your ease
Archive Converter
 This is our list of the online archive converter we provide. You can
either compress your file to a specific archive format or convert one
archive to another format.
This is our list of the online archive converter we provide. You can
either compress your file to a specific archive format or convert one
archive to another format.
Convert your files to the ZIP format
This free online ZIP converter lets you easily compress your files to the ZIP format. You can either upload your file or provide us a link to a file. Our converter will then download the link and convert it using the ZIP compression so you save bandwidth when downloading.
link to ZIP Converter
7z file converter
Create 7z compressed archives with this free online tool. You also have the possibility to convert an archive to 7z. Just upload your file or enter a URL where we can download the file you want to have in the 7z format.
link to 7z file converter
Create TAR.BZ2 archives online
This free online TAR.BZ2 converter allows you to compress your file to the TAR.BZ2 format. If you upload a compressed archive, it will be converted to the TAR.BZ2 format. You have the option to upload a file or provide a URL of a file you want to be compressed.
link to TAR. BZ2 Converter
Online TAR.GZ compressor
Create a TAR.GZ archive from your file or convert an existing archive to the TAR.GZ format with this free online archive generator. You can either upload your file or provide us a URL that will point to a file or archive and the conversion to the TAR.GZ format is started instantly.
link to TAR.GZ compressor
Monday, 23 September 2013
On the Road to Greener Living With Eco-Friendly Water Bottles

After all, who doesn’t feel good about recycling their plastic water bottle? The problem, however, is that many of these bottles don’t make it to the recycling bin and instead end up in landfills that are already overrun with too much trash.
Enter Las Vegas-based Alkame Water, a company that is combatting this problem by creating a water bottle that is designed to be biodegradable in landfills, as well as recyclable with other plastics.
And while much has been written recently on the dangers of freezing plastic water bottles, or conversely, drinking water from a plastic bottle that has been sitting in the heat (to do so is to possibly ingest cancer-causing chemicals), Alkame bottles do not require special storage, will not break down by heat, light, moisture or stress, and are BPA-free as well as 100 percent recyclable.
To accomplish what few others have been able to do, Alkame has enlisted BioSphere—a company dedicated to “giving back to society through global awareness education”—to create its bottles by using a material that is structured in such a way that once the bottle is in a landfill or composter, it degrades from within as well as on the surface. This composition is designed to speed up the biodegradation process by increasing the overall area that can decompose.
“The qualifications in order to be considered biodegradable are that the material must be scientifically proven to break down completely and return to nature in a short time frame,” BioSphere notes on its website.
No doubt, biodegradable plastics will be but one way that companies can reduce their carbon footprint, which is part of Alkame’s overall philosophy of health, for both the environment and for the individual.
Alkame’s formula includes oxygenation that improves aerobic capacity and enhances energy, antioxidants that can boost the immune system, and mild alkalinity for more effective hydration.
Latest Softwares and Downlond links
AHD Video Converter Ultimate V 6.9.2.0 + key
SOFTWARE-VIDEO EDITION(windows xp - windows 7)

SOFTWARE-VIDEO EDITION(windows xp - windows 7)
AHD Video Converter Ultimate is a complete video conversion
suite. It has a very simple and intuitive user interface, support for a variety
of input and output formats, a built-in DVD burner, and a video downloader that
allows you to download videos from video sharing websites.
The
converter supports most input formats and it has several video conversion
profiles. There are 5 main categories for the video profiles: common video,
common audio, HD video, online video and VCD/DVD. Those include all the formats
that you will probably need for normal conversion tasks. Below those profiles
are more profiles, but specifically designed for mobile devices and video game
consoles. The listed brands are Apple, HTC, Motorola, Nokia, and BlackBerry,
among others.
In my testing, the converter worked pretty well. I added an MKV file in HD which was recognized and added to the interface instantly. No problems there. I then converted it to an HD MOV file. The conversion didn't take long considering the quality of the file. If you have one of the latest Nvidia GPUs, this converter can use it to accelerate the process quite considerably.
Other solutions like this that only include a converter are priced similarly. AHD Video Converter Ultimate offers a video downloader and DVD burner, along with a basic video editor for the same price. It is a great tool and I recommend it.
Pros
- Great interface.
- GPU acceleration.
- Lots of profiles.
- Good format support.
Cons
- None.
Publisher's description
AHD Video
Converter Ultimate is a complete video conversion suite.
With this tool you can rip and convert DVD to HD video formats like HD MOV, HD WMV, HD AVI and standard video formats like WMV, AVI, MP4, FLV, MOV, MPEG, 3GP while preserving the high quality of DVD.
With this tool you can rip and convert DVD to HD video formats like HD MOV, HD WMV, HD AVI and standard video formats like WMV, AVI, MP4, FLV, MOV, MPEG, 3GP while preserving the high quality of DVD.

AviDemux 2.6.0.7907 (WINDOWS)
Avidemux is
a simple tool for simple video processing tasks. The keyword here is simple:
it does not offer tools like a timeline, multitrack editing, you cannot freely
move or splice audio and video clips from various sources. However, Avidemux
allows you to do elementary things in a very straightforward way.
When you
open a video file using the Open button (Ctrl+O) on the main toolbar, there are
3 basic things you can do with it in Avidemux:
- Cutting
Why: For example, cutting out ads from a TV recording, or saving only a small part of a video you are interested in.
How: Select a portion of the video with the mark A and mark B buttons, and either delete, copy, paste or save that part. If you do not reencode the video (that is, if the encoder is set to Copy), make sure all segments start with keyframes, or the resulting video will be broken at cut points. See the Cutting chapter for more details. - Encoding
Why: You may want to convert the video to a different video format that your hardware or software players understands, or you just want to compress the video to a smaller size, for archiving or publishing it on the Internet.
How: Encoding in Avidemux means selecting an encoder that does the video compression. That is, the drop-down menu on the left cannot be set to Copy. See the - chapter for more details.
- Filtering
Why: Basic filters applied to the picture like deinterlacing or resizing come in handy for various format conversions. Other filters may be used for adding subtitles to the picture, color correction etc.
How: Filters require reencoding. So you have to select an encoder first, then you can add filters using the Filters button. See the Video filters chapter for more details.

When you are
done with cutting, setting encoders or filters, save the resulting video file
using the Save button (Ctrl+S).
In addition,
there are other small features you can use, like saving or replacing the audio
track from the video, joining several video files or saving a snapshot of your
video.
To encode or not to encode
Avidemux
works in two basic modes: copy mode and encoding mode.
Copy mode
When the
audio or video encoder is set to Copy, it means no reencoding takes place, and
the audio or video track from the input file is just copied to the resulting
file as-is. This means it is very fast (usually a couple of minutes at most),
and there is no quality loss.
Use the copy
mode when:
- you just want to cut out parts from the video, without changing the output format
- you want to append several files (using either File→Append or the automatic appending that Avidemux provides) – if the resolution (width, height), video format, audio format, audio bitrate and sampling rate is the same for all files, you can use the copy mode
- you want to fix constant audio/video desync (using the Shift option in the audio section)
- you want to perform technical changes like saving the video to a different container
Encoding mode
When you
select an audio or video encoder, the audio or video track is reencoded. If the
compression is lossy (with most encoders it is), this implies quality loss.
Encoding is also much slower than copying. Depending on the speed of your
computer, it can take hours to complete.
Use the
encoding mode when:
- you want to perform audio or video format conversion
- you want to compress the file to a smaller size (at the expense of quality)
- you have to do precise cutting that's not possible to do on keyframes
- you want to use filters (it is impossible to filter audio or video without reencoding it)
- you want to join several files with differing properties (different formats, different resolution etc.)
Basic terms
Since
Avidemux is a tool that does not do things automagically for you and only
executes the steps you directly tell it to perform, you should really
understand what you are doing and why. Before you use Avidemux, you should
understand basic characteristics of multimedia files, such as:
- Container format: audio and video tracks are
stored in a single file, in a container. The container format does not
influence the audio or video quality, it is only a way of storing video
and audio in a single file. In Avidemux, the container format is selected
in the (Output) Format section at the left.
Note: Always select an appropriate container format for the file you are saving! See the Output formats chapter for more details. You should also add a suitable extension to the file name when you save the video, like .avi for the AVI container format, or .mkv for the Matroska container format. Avidemux version 2.5 or older does not add the extensions automatically! - Video format: this is the way the video stream is encoded in the file, usually in compressed form. Modern compression fomats usually offer better quality/size ratio than old ones. Common video formats include H.264, MPEG-4 Part 2 or MPEG-2 Part 2.
- Audio format: the way the audio stream is
stored in the file. Common audio formats include AAC, MP3, MP2, Vorbis or
PCM (uncompressed).
Note: Do not confuse audio and video formats with audio and video codecs. Codecs are tools used for encoding and decoding, while formats are methods of encoding the data. See the Common myths chapter for more details. - Encoder: this is a tool used for encoding the audio or video stream into the desired format. Some encoders are better than others – even if there are multiple encoders for the same format, one of them may offer higher quality at the same size. In Avidemux, you can select the software encoder in the Video and Audio sections. Of course, the selected encoder then implies the output format as well.
- Decoder: a tool used for decoding the input video or audio stream. Avidemux uses internal built-in decoders. If it does not have an appropriate decoder for the video or audio format, there will be no video or audio.
So, what
does this all mean? Let's see a couple of use cases:
- You want to cut out unwanted parts from a video, losslessly (in copy mode). You have to know the source audio and video format. Avidemux can show you the file properties using the Info button after you open it. Then you select an appropriate container format that's suitable for the video and audio format combination (typically the same container format that's used for the source file), leave audio and video encoders at Copy, do the editing, and finally save the file.
- You have a Matroska (*.mkv) file with H.264 video and AAC audio. The Matroska container format is not supported (and therefore not playable) by default on Microsoft Windows, Mac OS X (without additional software) or various hardware devices, but H.264 and AAC is! This means you can open the file in Avidemux, change the output format to MP4 (which is the container format supported by default on those platforms), and save it in copy mode. Audio and video tracks will be left untouched, so it will be quick and lossless. Only the wrapper, the container, will be different. If the H.264 video was encoded with basic features supported on those platforms, the file should now be playable there.
- You have a video saved from a DVB-T recorder, DVD or other sources and want to archive it in a more compact form. So after you open the file and do some editing, select a video encoder with the best quality/size ratio, that is x264, configure it, add video filters like deinterlace, crop and resize to make the video more compressible, select Matroska or MP4 as the container format and save the file. You may even save the original audio track in copy mode if you want to avoid any quality loss, as audio in DVB-T or DVD is already compressed and does not take as much space as video.

Sunday, 22 September 2013
iOS 7: How To Get It And What To Expect

The long-awaited release
of iOS 7 has come upon us at last: the new version of iOS was made
available to the wide public by Apple on Wednesday, September 18th. What
followed after that was hours of frustration of many customers, all
because of annoying errors during the download, which meant that they
had to start all over again several times. After the presentation of new
iPhones on September 10th, this is the next Apple novelty that is
supposed to bring smiles to the anticipating faces of Apple fans, but it
is still too early to judge whether or not the actual product will live
up to their high expectations.
 If your device is iOS 7-compatible, then you get to choose from one
of two methods of getting the new iOS, whichever feels more comfortable
for you. The first one only requires the mobile device itself; the
second one involves a USB cable, a computer, and the latest version of
iTunes.
If your device is iOS 7-compatible, then you get to choose from one
of two methods of getting the new iOS, whichever feels more comfortable
for you. The first one only requires the mobile device itself; the
second one involves a USB cable, a computer, and the latest version of
iTunes.
If you have a reliable Wi-Fi connection, you can upgrade your device by simply navigating to Settings > General > Software Update. Click the Download and Install button for iOS 7.0 as seen on the picture below.
 Once the download is completed, click Install Now.
After the installation, your device will restart and you'll be walked
through the rest of installation process, which is very simple and
straightforward.
Once the download is completed, click Install Now.
After the installation, your device will restart and you'll be walked
through the rest of installation process, which is very simple and
straightforward.
Mac users: Click the Apple Menu icon, followed by Software Update
Windows users: Use Help menu in iTunes and click Check for Updates
Now you simply need to connect your device to the computer via the USB cable. Once you've done that, iTunes will automatically open up. If you're using the autosync feature, then your device will be backed up by iTunes; if not, you can always do it yourself: click on your device in the upper-right corner of the iTunes interface and choose Back Up Now in the middle area named Backups.
 After you're done backing up, click Check for Update/Updates as seen in the picture above to upgrade to iOS 7. A new pop up window will appear providing you with two options: Download Only (if you wish to install it later) or Download and Update. When you make your choice, you
will be able to monitor the progress bar at the top of iTunes and
finish the installation. You'll be walked through the rest of the
process, which is extremely easy and is basically just setting up the basic settings (iCloud, Location Services, iMessage etc.)
After you're done backing up, click Check for Update/Updates as seen in the picture above to upgrade to iOS 7. A new pop up window will appear providing you with two options: Download Only (if you wish to install it later) or Download and Update. When you make your choice, you
will be able to monitor the progress bar at the top of iTunes and
finish the installation. You'll be walked through the rest of the
process, which is extremely easy and is basically just setting up the basic settings (iCloud, Location Services, iMessage etc.)

How to set up iOS 7 on my device?
First and foremost, check if your device is compatible with the new operating system at all. Here's the list of devices that are actually supported:Method 1: Over the air
Note that many users experience errors using this method.If you have a reliable Wi-Fi connection, you can upgrade your device by simply navigating to Settings > General > Software Update. Click the Download and Install button for iOS 7.0 as seen on the picture below.
Method 2: Upgrade via iTunes
Okay, you have a computer with iTunes in front of you, a USB cable for your iDevice, and the device itself and you're probably wondering what is the next step. Well, first, make sure your iTunes is updated to version 11.1; and if it's not, update it:Mac users: Click the Apple Menu icon, followed by Software Update
Windows users: Use Help menu in iTunes and click Check for Updates
Now you simply need to connect your device to the computer via the USB cable. Once you've done that, iTunes will automatically open up. If you're using the autosync feature, then your device will be backed up by iTunes; if not, you can always do it yourself: click on your device in the upper-right corner of the iTunes interface and choose Back Up Now in the middle area named Backups.
A quick look at what iOS 7 can offer
The new iOS has brought some really great features, although some of them have been met with no small amount of skepticism. Let's have a quick look.Design
Apple
developers have reinvented the whole color theme used in iPhone, it now
looks much brighter and somehow deeper. Some animations have been
replaced with new ones, the most notable of which is the fade-in effect
when unlocking the screen. Oh, and now you don't have to aim for the
unlock bar and slide it, you can use the whole screen instead (nice!).
Control Center
That's
where iOS 7 really brings something new to its users: Control Center
puts most frequently used settings front and center for your comfort
and, what's even better, it's available from any screen. The
notifications pull-down bar has also undergone some changes: there's now
three tabs that will show you alerts, messages, and calls you have
missed as well as your schedule for today.
Photos and Camera
Some
major work has been done by Apple in organizing your photos (the Photos
app): with iOS 7, you get them organized according to actual locations
where those were taken and not only their chronology. There are even
preset Insragam-like filters that you can quickly apply to your photos,
and a burst-caption mode that allows you to take continuous shots to
pick the best one later on.
Safari browser and AirDrop
The
unified search and address bar has finally come to Safari, which many
were hoping to see in many previous versions of iOS. The new browser by Opera,
Coast, that recently came out, had it from the very start; it's an
obvious time saver, so why not implement it by default. The inclusion of
a peer-to-peer sharing service, called AirDrop, is also a major boon
for a lot of people.
Overall
I
did upgrade my iPhone 5 to iOS 7 and so far I am pleased. I've only
been using it for half a day, though, so there might be some painful
surprises on the way. Still, it seems like Apple hasn't lost its flair
for making shiny things that are pleasant to play with.
What is Cache Memory?
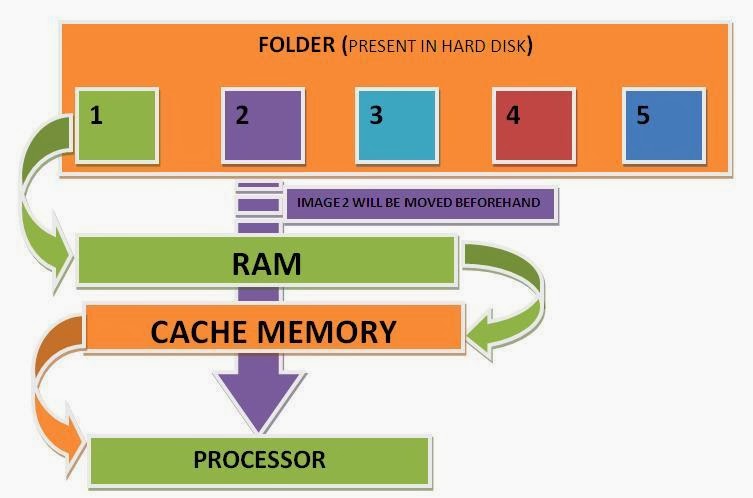
source of article .... http://www.wisegeek.org/what-is-cache-memory.htm
shared graphics vs dedicated graphics

Integrated
An integrated graphics processing unit (GPU) doesn't use its own RAM; it utilizes the system's memory instead. So, if you have a computer with 4GB of RAM, the video card can use anywhere between one and five percent of the available memory for graphics processing. Of course, this percentage varies depending on the size of task, especially if you're multitasking or playing a game.
The benefit to an integrated unit is that it is cheaper, which in turn means a less expensive computer. An integrated graphics card also generates much less heat than a dedicated video card and uses drastically less power, which improves the overall battery life. Integrated graphics cards are perfect for people doing everyday graphics processing. This includes watching or editing videos, 2D gaming and general word processing. Such activities aren't graphic intensive, so a low-end video card is ideal. That doesn't mean you won't be able to play 3D games, but you will have to turn down the graphics settings or you'll experience in-game slowdowns.
Dedicated
A dedicated, or discrete, GPU has its own independent source of video memory, leaving the RAM your system uses untouched. If you have a GeForce GTX 680M video card with 2GB of video memory, for example, that memory is completely separate from your computer's 8GB of system memory. Dedicated cards are perfect if you are into serious gaming or are a professional graphic designer.
There are a few drawbacks to having a dedicated card, however. If you don't have the appropriate design or a good fan, these video cards will get warm. If you are a serious gamer or if you run a dual-monitor system, the GPU will have to work harder and will heat up quickly. These cards are also power hungry, so using a laptop with dedicated graphics card will decrease the battery life. You should also expect to pay more for this kind of card. Price differences can vary, up to hundreds of dollars more for a dedicated GPU than an integrated GPU.
One thing we recommend if you are going to use a dedicated card is to make sure you get a laptop with at least one or two fans and plenty of vents. You can find special cooling stands as well if you want give your system extra protection from heat.
Some video cards are switchable. This means the GPU is built as a dedicated and integrated card. When you do things such as editing a spreadsheet or browse, the card switches to the integrated unit, which will preserve the battery of your laptop. When you watch a high-definition movie or play a graphic-heavy game, the card then powers up and works as a dedicated card, improving the overall performance but lowering the battery life.
Before you make a decision regarding the kind of graphics card you want, be sure you know how you will use it. If you are a casual user, integrated graphics are great. You can browse the web, watch YouTube videos and even watch Blue-ray movies without any problems. Dedicated video cards are perfect for those of you who want the best visual experience, whether you are gaming or designing graphics. Remember, games' visual designs will continue to improve. You should plan ahead and find a card that will hold up for at least a few years before you need to upgrade.
Subscribe to:
Posts (Atom)